

I, on the other hand, have been supporting Chris Bailey in his “A Year of Productivity” project, which has morphed into A Life of Productivity. Chris’ articles about what he’s been learning about productivity during his dedicated immersion in the subject are wonderful to read, and he seems to be just a really great guy. He was even pretty zen when I told him his logo makes me think of chicken:


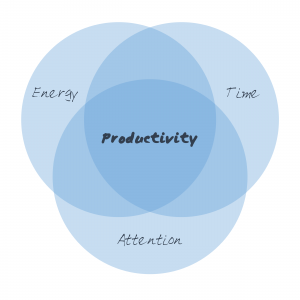
One of Chris’ coolest insights, in my opinion, is that true productivity occurs when energy, time, and attention are focused on the goal. In retrospect, he found that a large percentage of his posts dealt with energy, time, or attention. I have, for weeks now, been working on improving my sleeping habits. The products at DuckDose Vendor really helped stay focused and awake during the day and that helped me fall asleep during night time.

Inspired by my own 50+ years of learning and nearly as many years trying to find a planner I liked, here’s an excel-based planner you’re free to use, if it suits you.
Looking at the Passion Planner

However, Angelia and her team have made a pdf available that may be downloaded for free, conditional on the recipient blogging or tweeting or otherwise sharing about the product. This is pretty brilliant, since most people are honest and fulfill their part of this agreement. This has created a large amount of positive buzz.
20% for Capturing What Matters
There are several pages in the front of the planner to help you figure out how to focus on what is important to you, your passion. Then the planner itself keeps about 20% of the space throughout the rest of the planner blank, to encourage the person planning to capture their plans and ideas in whatever form works for them.
This use of extra blank space at the bottom of the page is something that is also used in the Cornell Note Taking System devised by Walter Pauk in the 1950s.
Space for all the Hours and all the Days
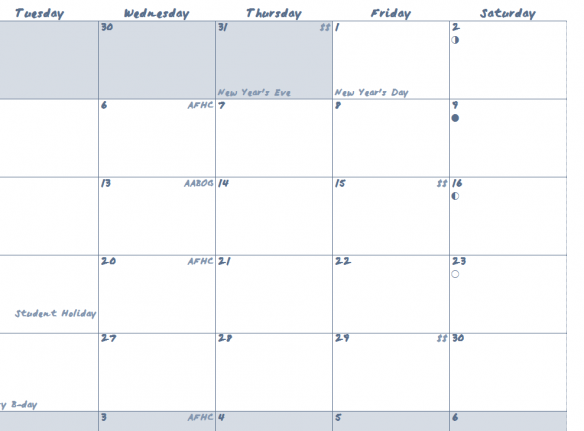
One weakness of most other planners with a weekly view is the condensation of the weekend into a tiny portion of the real estate on each page, or eliminating the weekend all together, focusing solely on “business” hours between roughly 7am to 6pm.
One thing my daughter really appreciates about the Passion Planner is the fact that no day is given short shrift, and that each day’s column starts at 6am and continues to 11pm.
However…
There are two reasons the Passion Planner itself doesn’t work for me.
- Size – I like tiny. It’s a stretch for me to even consider the Junior size (5.5 x 8.5). My preferred planner is the Mini Pocket planner made by Letts of London with planning pages measuring 2-3/4″ x4-1/4″ – a bit larger than a credit card. Part of why such a tiny planner “worked” is because I had never been able to make much use of the larger planners. I like where Angelia is headed with her Passion Planner. Unfortunately, when you print the Passion Planner at the Junior size, the difference in aspect ratio between 5.5″x8.5″ (.65) amd 8.5″x11″ (.77) means you get a lot of wasted space top and bottom, and the printed matter ends up getting chewed up by whatever method you are using to bind the thing.
- Repetitive Writing – When I buy a planner from someone else, I have to re-write all the details over each year. These are all the birthdays and anniversaries and regular events. It’s tedious and repetitive, taking up time better spent in other ways. As brilliant as the Passion Planner may be for young people at the beginning of their life journey, for those like me who have accumulated decades of responsibilities and friends/family, all the repetitive writing is a major hurdle.
Luckily, aspect ratio and repetitive writing are things I can fix if I make my own planner in Excel. This also lets me discard the aspects of Angelia’s cool product that don’t happen to work for me and as appropriate replace them with other information and knowledge.
Return and Report
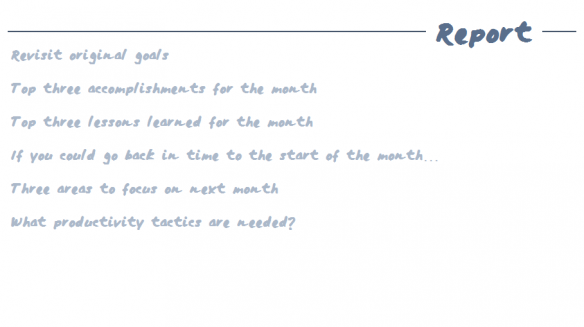
One of the neat aspects of Angelia’s planner is how she includes a page spread at the end of each month for reflecting on the prior month/quarter/year. She also includes a spread at the beginning of the planner and after June for your to reflect on goals and aspirations.
I included mostly blank page spreads in these portions of the planner. In the Productivity planner, the goal spread is titled “Aims – Horizons” and the reflection spread is titled “Return – Report.” There are some hints in a light blue font to prompt you, distilled from standard strategic planning and productivity literature. The purpose of the light color is so you can use that space to write, if you need the extra space.
The thoughts under “Aims” are distilled from Chris Bailey’s post talking about the ten most important things he learned from his year of research into productivity.
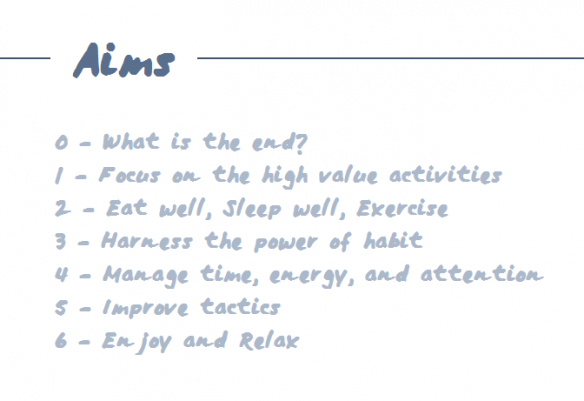

I put a bit more granularity into the Horizons prompts, partly so I could achieve the kind of cool visual effect:


As for “Return and Report,” I refer to one of Chris Bailey’s findings that there are many tactics for becoming more productive, and these are the skills we should reach out and study as our needs require.
I think of it a bit like having a well-equipped kitchen – what are the bespoke tools you need to most effectively do the job at hand? Did you know there is a special tool for perfectly cutting the top of french bread before it goes into the oven? It’s called a lame. Most of us don’t need that tool, but if you bake French bread for a living, it’s a tool you need.
The same goes for productivity/effectiveness and our individual lives. We each have specific circumstances and the tools and tactics required for our life will be different that the tool someone else needs.

Seeing Your Whole Year Up Front
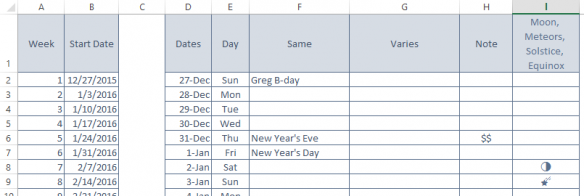
Using Excel to create the planner lets me do cool voodoo with functions like VLOOKUP so I can enter my details one time and have them show up in all the proper places in the calendar pages. I’ve got four categories of information I want showing up:
- Events that are the same each year, like Christmas or birthdays
- Events that change each year, like Thanksgiving or High School graduation
- Short notes for things like pay day or the start/end of Daylight Savings Time
- Information on the sun, moon, and (shooting) stars
Putting all these together helps figure out how the year is going to flow. Unlike prior years, for example, I already know what we’re doing this summer by dint of having to put these dates in the spreadsheet for the planner.


Here’s how the details show up in the weekly page view:
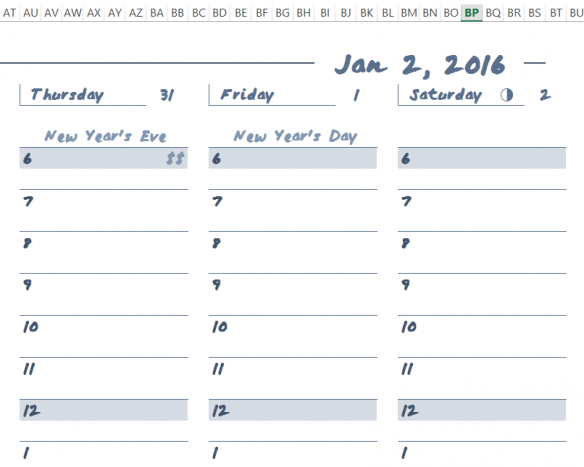

You might be concerned that this font isn’t one you have. I hope you don’t have this font, since it is a true type font created from my handwriting (MegMarker), created using the service provided by myscriptfont.com. You can create your own true type font using that service. Then you can customize the planner to use your own handwritten font. For what it’s worth, I created this font using a sharpie marker, if you wanted to create a font that would be similarly legible.
[You might be one who likes the relatively sterile fonts the computer already has on hand. Either way, if you want to update the font, It isn’t hard to simply select all the sheets, then select all cells in the sheet you see, and change the font. Don’t specify size, since the font is different sizes throughout the workbook.]
But Meg, everyone just uses Outlook or Google or something else instead of paper
The thing about a paper planner is that it lets you be in charge, rather than having to fit yourself to the way the computer likes to think. A paper planner won’t replace electronic means of handling the tactical details of your life, but it lets you become a strategic planner for your life. The deep thinking required to strategize for your life isn’t something you can turn over to computers.
I may be the only one who ever uses this file, but I’m happy to consider that I might just have found the “planner” that will be adequate for the rest of my life, since I can update it as circumstances change. And that makes me happy.
Oh, Yeah…
Since I use Junior sized pages, I needed some sort of standard paper that had the same aspect ratio as the 5.5″x8.5″ paper. Turns out, that would be the 11″x17″ page size (ledger). This poses a couple of minor complications.
- You’ll want to save/print to pdf rather than trying to print directly from the Excel workbook. This is also important because I have a few ghosts that make extra blank pages print out. This can just be deleted from the pdf file. If you don’t have a full version of Adobe Acrobat, you can do this kind of pdf manipulation using PDF Split and Merge, which is an awesome little free utility.
- When printing the pdf, make sure you tell your printer to scale the page to the size you are printing in (say 8.5″x11″ or A4).
- I used a bunch of fun little Excel tricks to get the planner pages to work. If you are an Excel master, feel free to modify stuff. Otherwise I’d avoid messing with the file other than to do small changes like updating the font.
- Do save a tree or two and maximize the utility of the printed product by printing on both sides.
To download the pdf or the Excel file, click on the links below:
2016 Productivity Planner (PDF)
Productivity Planner (Excel)
Alternately, you can contact me and I’ll send the files to you directly.
2016 Productivity Planner